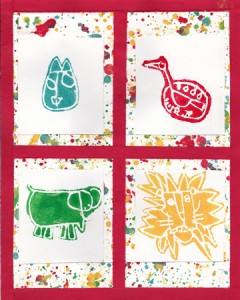
Lesson: Animal Print Paper Quilts
Arts For Life artists love printmaking! and they love animals! This lesson combines both in a simple, approachable way. If you’re trying this at home, you can use a clean Styrofoam takeout box in place of the scratch foam.
Skill Level: age 4+
Time Frame: 15-30+ min
Printmaking: A print is a shape or mark made from a block or plate or other object that is covered with wet color (usually ink) and then pressed onto a flat surface, such as paper or textile. Most prints can be produced over and over again by re-inking the printing block or plate. Printmaking can be done in many ways, including using an engraved block or stone, transfer paper, or a film negative. definition from www.artlex.com
Goals
- To discover new ways to use materials in creating a printing plate.
- To learn about the process of creating a plate and prints when discovering printmaking.
- To learn and practice simple drawing techniques.
Materials
- Ball Point Pen
- Small Scratch Foam sheets – 3”x5” or 4”x6”
- Optional: Scratch paper + Pencil
- Brayer
- Plexiglass Plate,
- Blockprinting Inks
- Barron
- White cardstock 2.5”x2.5” and 9”x12”
- Optional: Animal drawing books
- Scissors
- Glue Stick
- 9×12 Patterned or Pre-Painted Paper
- Colored Construction Paper or Cardstock cut into ½” strips
Steps
- First, choose an animal. Your drawing will be small, so keep it simple. If you prefer, you can sketch your animal on a piece of scratch paper first using a pencil. You can also draw directly on the foam using the ball point pen, but it’s important to know that you can’t erase!
- Once the animal drawing is complete, use scissors to cut around the drawing, leaving a little bit of room around the edges (i.e. don’t cut on the line; cut a little distance from the line)
- Choose one color of block-printing ink for your print. Squeeze a blob of color onto the center of the plexiglass. Roll a brayer through the ink until the roller is covered with an even layer of ink and you hear the “kissing” sound.
- Place the foam piece—drawing side up—on a scrap piece of paper to protect the table. Roll ink onto the foam with the brayer until the ink has covered all of the surface.
- Gently pick up the plate by its edges, flip over carefully, and lay it in the center of the cardstock. Press down firmly with a flat palm.
- Turn the foam and cardstock over so that the paper is on top. Rub a a baron over the back, applying gentle pressure. Make sure to press down all areas!
- Turn back over an pull the plate off of the paper to see results. Set aside to dry.
- Repeat steps 1-7 with 3 different animals.
- Choose a piece of patterned or painted paper onto which you’ll glue your prints. Make a border around your paper by gluing down strips of colored paper along the edges. Glue down strips across the center of the paper both horizontally and vertically to create four sections to your paper.
- Glue your dried prints to the paper—one in each of the four sections.
Tweak It!
- Do the same project, but instead create a series of portraits
- This would also make a great collaborative project (just like the example in the top left corner!)