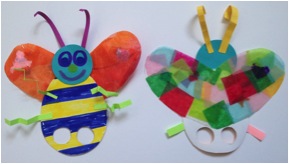
Lesson: Bug Finger Puppets
September is all about creatures at Arts For Life, and our young artists have been as busy as, well, bees creating flying bugs! With simple materials and these steps, you can make a working finger puppet at home.
Goals:
- To create a working finger puppet using simple materials.
- To practice precise gluing and accordion folding.
Materials:
- Cardstock/paper, pre-cut into a bug body with finger holes and into head, leg, and antennae shapes
- Contact paper and other colored paper, cut into heart-shaped wings
- Tissue paper, cut into small squares
- Glue
- Tape
Directions:
- Attach the head of your choosing to the top of a body with glue.
- Color in the body, and draw on a face.
- Attach two legs to each side of your body, above the finger holes. (Remember that insects have six legs, and your fingers will be two of those legs!) Attach two antennae to the top of the head.
- To make contact paper wings, peel the backing off of one contact paper heart. Lay tissue paper squares onto the sticky contact paper; leave blank space for clear wings, or fill them up entirely. When you are finished, lay a second contact paper heart onto the top to seal in your tissue paper design.
- Attach your wings to the bug’s body using a loop of tape.
Tweak It!
- To go one step further, accordion fold the legs and/or antennae, OR curl them using your fingernail or the edge of the table. You can also color the contact paper wings using oil pastel instead of/along with tissue paper (draw directly onto the sticky side of the contact paper; it creates a great effect!).
- To simplify, skip the contact paper wings and use paper wings. Decorate, or just attach.
- Get creative with your bugs! Make a spider instead. Six legs + your two fingers = eight spider legs!
© 2015 Arts For Life